Part 9 - Learning HTML for Beginners
Written by Eric Muss-Barnes, 12 December 2018
Before we start on the basics of building an HTML page, there are 4 things I want to explain:
1.) Get a good text editor.
2.) Download a .ZIP file of the lesson.
3.) Learn to "refresh" a browser page.
4.) Learn to "view source" in a browser.
Let's go over those 4 points, one at a time...
GET A GOOD TEXT-EDITING PROGRAM...
I suggest using Notepad++ if you are using Windows.
I suggest using jEdit if you are on Apple macOS.
I have provided links below to both of those programs.
Here are a few other options...
Microsoft Windows:
1.) Notepad++
2.) Note Tab Lite
3.) Em Editor
4.) TextPad
5.) Note Pad (comes with Windows, but has no syntax-highlighting)
Apple macOS:
1.) jEdit
2.) TextWrangler
3.) BBEdit
4.) TextMate
5.) TextEdit (comes with macOS, but has no syntax-highlighting)
The reason you want to use a good text-editor is because the better programs have "syntax-highlighting" features. Syntax-highlighting will colorize sections of code, to make it easier to identify the section you are working with. Let me give you two examples below. I know you are not going to understand the code, but that's not the point. I just want you to see the visual difference between working with and without syntax highlighting. This first image features syntax highlighting.
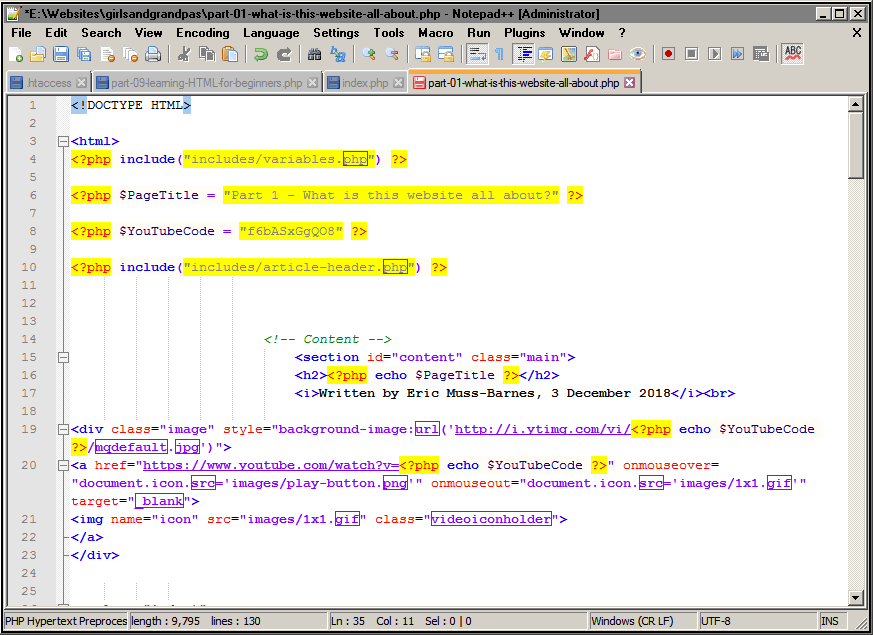
As you can see from the example above, even if you can't read the code or understand it, the color-coding makes different sections stand out more than others.
Below is an example of the same code, without syntax highlighting.
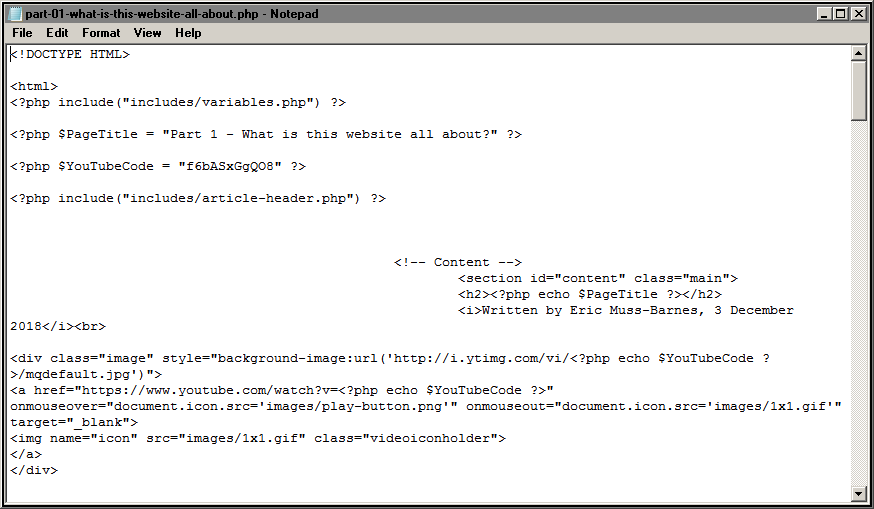
Looks far more confusing without the colorized code, doesn't it? This is why I suggest you use a program offering syntax-highlighting. It simply makes it easier to identify and isolate the blocks of code you are working with.
Make sure you are using a text-editor and DO NOT use a word-processor.
Why?
Because word-processing programs (e.g. Microsoft Word, Apache Open Office, etc.) will often monkey around with your code, and change it when you save the file. Since you want complete control over the code you are writing, I can not suggest you use ANY word-processing programs.
There are some specialized web-building applications/programs which tie the visuals of the browser into a text-editor feature. These are called "WYSIWYG" programs. WYSIWYG (pronounced "whizzy-wig") in an acronym for "What You See Is What You Get" and they were very popular and trendy for a time. I do not recommend using any WYSIWYG software either.
Why?
You may think it's a good idea to build a page the way you want visually, then study the code written for it. That could be a fantastic way to learn! Yes, that sounds like a great theory on paper. Unfortunately, WYSIWYG programs don't allow you to do that, because WYSIWYG programs are notorious for writing horrible code. They are clunky and inefficient and create very complicated and bloated files, for even the most simplistic of webpages. So, to learn this the proper way, stick with a text-editor and a browser.
DOWNLOAD THE .ZIP FILE OF THE LESSON..
At the bottom of the page, you will see another download link called ".ZIP File of Lesson Code". Please download that file before we begin, and open it on your computer. When you run the .zip file, it should automatically create a folder containing all the files we will use in this lesson.
LEARN TO "REFRESH" YOUR BROWSER...
For these lessons, you are going to need two programs running simultaneously. You will want to open the .html files in your syntax-highlighting text-editor and your favorite web browser, at the same time. You want the .html file opened in both, so you can alter the file in the text editor, then refresh your browser and see your changes instantly. Anytime you change the code in the text-editor, you will hit CTRL+S to save the page, then switch to your browser and refresh the page to see your changes. In order to refresh your page in a browser, there are two options:
1.) Hit the "F5" key at the very top of your keyboard.
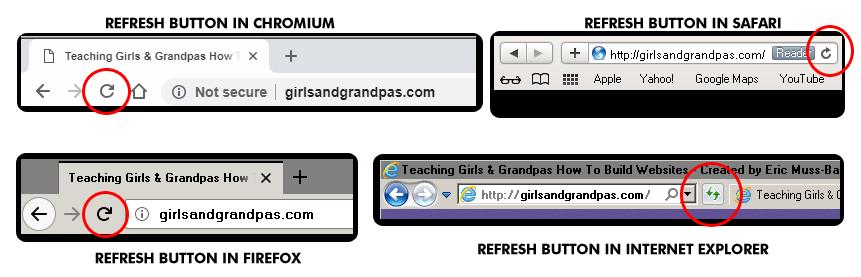
2.) Click the "refresh" button near the URL field.
The refresh button is typically a spiral arrow, or a double-arrow of some sort, indicating a reload of the page. Below are some examples of what the refresh button looks like in various browsers.
LEARN TO "VIEW SOURCE" YOUR BROWSER...
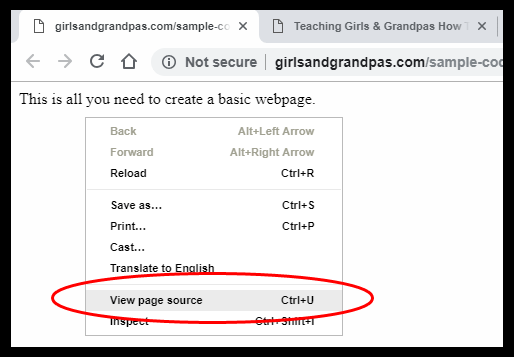
For these lessons, you will often want to view the sourcecode inside your browser. In most browsers, you can do this by right-clicking on the page and selecting "View source..." or "View page source..." or something similar. Alternatively, you can use the CTRL+U keyboard shortcut. This will pop-up a new browser window, displaying the HTML code for that page. See below for an example:
LET'S GET STARTED!...
Finally, we can begin to program an HTML page!
First, let's make the most simplistic page we can, with a "comment" on it.
If you click the View Demo button, you will see the webpage that this code creates.
PART 9 - LESSON A - COMMENTS
I am always going to show you the example code in a black box with green text, like you see below. You can either copy-and-paste this code into your text editor, or you can view the demo by clicking the button beneath the black box, or you can follow along by finding this lesson in the .zip file you downloaded. Whichever method you prefer to use is fine. I want to make sure you have plenty of options, then you decide which workflow is best for you.
<html>
<body>
This is all you need to create a basic webpage.
<!-- This is called a "comment" and it will not display on the webpage. A comment is begun (or "opened") by a less-than-sign, exclamation point, and two dashes. These symbols must be typed with no spaces between them. A comment is ended (or "closed") by two dashes and a greater-than-sign. These symbols must be typed with no spaces between them. -->
</body>
</html>
Next, let's go over some basic functionality of HTML tags. What are "tags"? I will explain them in the next lesson. Keep on reading, buckaroo!
PART 9 - LESSON B - TAGS
<!-- The text below this comment are called a "tags" - specifically, these are the "open tags" for the BODY and the HTML elements. "Elements" in HTML are just "stuff on the webpage" - they aren't real elements like EARTH, WIND, FIRE and AIR or anything. Computer-nerds just like to use fancy terms like "elements" to confuse normal folks like you and me. All HTML elements will "open" and "close" (or "begin" and "end") with a tag of some sort. Tags always exist between a less-than and greater-than sign. -->
<html>
<body>
This is all you need to create a basic webpage.
<!-- Again, this is called a "comment" and it will not display on the webpage -->
<!--
As you can see here, comments can be written over several lines. In any quality text editor with color-coding, this comment text should also be a different color from the other text on the page.
I will use many comments in these pages to explain what the code is doing. Just remember that comments will remain invisible and NOT be rendered to the page. If you remove all the comments from a webpage, the page will still work perfectly fine.
-->
This sentence is written outside of the comment tag - therefore, it should appear immediately after the first sentence (even though there's lotsa other stuff on this page when you view the sourcecode).
<!-- The text below this comment are called "tags" - specifically, these are the "end tags" for the BODY and the HTML elements. All HTML elements will "open" and "close" (or "begin and "end") with a tag of some sort. Tags always exist between a less-than and greater-than sign. -->
</body>
</html>
You may have noticed something very important is missing. All webpages should have a title in the title-bar of the web browser. So far, the two example pages above have not had titles. Let's show how to add titles in the next lesson.
PART 9 - LESSON C - TITLE
<html>
<!-- Below this comment starts the "head" tag. There are several other tags which can be written between the "open" and "close" of the "head" tag (or "nested" inside the "head" tag). We'll talk about those later. For now, I just want to introduce one of them, called a "title" tag. -->
<head>
<!-- Below this comment starts the "title" tag. This is what appears in the title-bar of the webbrowser. As you can see, the "title" tag is nested within the "head" tag. That means the <title> and </title> are between the <head> and </head> like so:
<head> <title></title> </head>
-->
<title>HTML for Non-Programmers</title>
<!-- Above this comment ends the "title" tag. This is what appears in the title-bar of the webbrowser. As you can see, the "title" tag is nested within the "head" tag. -->
</head>
<!-- Above this comment ends the "head" tag. There are several other tags which can be written within the "head" tag (or "nested" inside the "head" tag).-->
<body>
This is all you need to create a basic webpage.
<!-- This is called a "comment" and it will not display on the webpage -->
This sentence is written outside of the comment tag - therefore, it should appear immediately after the first sentence. This page should also read "HTML for Non-Programmers" in the titlebar of your browser.
<!-- The next page will remove the comments, so you can see what the pure, uncluttered HTML looks like up to this point. -->
</body>
</html>
The comments can make things a little cluttered. Let's take a look at the page without comments.
PART 9 - LESSON D - WITHOUT COMMENTS
<html>
<head>
<title>HTML for Non-Programmers</title>
</head>
<body>
This is all you need to create a basic webpage with a title in your titlebar. Note that when viewing the sourcecode of this page, all the comments on this page have been removed. In order to make the text on your webpage easier to read, the next page will teach you how to create paragraphs.
</body>
</html>
Now you have seen some basic text on the page. Let's see how to format a large block of text.
PART 9 - LESSON E - PARAGRAPHS
<html>
<head>
<title>HTML for Non-Programmers</title>
</head>
<body>
This is all you need to create a basic webpage with a title in your titlebar. In order to make things easier to read, this page will teach you how to add a "break" tag to your code. There are "paragraph breaks" and "line breaks" on this page.
<!-- The code below this comment is a "paragraph break" tag ("p" for "paragraph"). As you can see, it leaves a space equal to the line-height of your text, between the paragraphs. -->
<p>
The previous pages had all the text flowing together. Note that
even
when
you
place
linebreaks
in
your sourcecode, you will not see a linebreak on the webpage unless you use HTML tags to create those breaks. Be sure to look at this paragraph in your text editor and in your browser and note the difference in the formatting. In this paragraph, you will see linebreaks in the text editor, but not in the browser - because the linebreaks are not using HTML tags.
<!-- The code below this comment is a "line break" tag ("br" for "break"). As you can see when you view this page in a browser, it moves your text onto the next line, with no spacing. -->
<br>
Alternately, you can use a "line break" tag instead of a "paragraph break" tag - the "line break" tag simply jumps<br>your<br>text<br>down<br>onto<br>the<br>next<br>line, instead of into a new paragraph. Computer-nerds will tell you "paragraph break" tags are outdated, so you must only use double "line break" tags to get the same effect.
<!-- The code below this comment are two "line break" tags. As you can see when you view this page in a browser, they have the same effect as a single "paragraph break" tag. -->
<br><br>
That is computer-nerd hogwash! Don't listen to them. Regardless of any edicts handed down by the pretentious Oracle Of Computer Nerds, the "paragraph break" tag functions perfectly in all webbrowsers and therefore is not "outdated" in any way. Feel free to use "paragraph breaks" and "line breaks" as you see fit to control your text spacing. One more important note to defy the computer-nerd crowd - paragraph and line break tags DO NOT require a closing tag. Many computer-nerds use closing tags for paragraphs and line breaks, saying that is the "proper" way to write your code... but those close tags don't actually do anything. Don't use them. Let the computer-nerds waste more time typing. You and I have other things to do, so we want our code to be fast and efficient.
<p>
So, to review - you can control the line-spacing of text with 2 different tags - "paragraph" or "line break" - which jump text into a new paragraph or a new line respectively.
<p>
These pages have been pretty boring up until this point. Next, let's spice things up by adding pictures! Woohoo! We will also add some simple navigation by showing you how to make links, so getting to new pages becomes a little easier. Since the concept of "HTML tags" is hopefully a little easier to understand at this point, the explanations will be slightly less detailed and we'll start to speed things up a tad. Ready? Onto the next page...
</body>
</html>
Okay. We have gotten fancy with formatting text and paragraphs. Next lesson will add pictures...
PART 9 - LESSON F - LINKS AND PICTURES
<html>
<head>
<title>HTML for Non-Programmers</title>
</head>
<body>
Please remember to "view source" on this webpage by going to <b>View -> Source</b> (or <b>View -> Page Source</b> in Firefox).
<p>
Adding a picture to a page is very simple. If you view the sourcecode for this page, you will see the code used to display the image shown below.
<p>
<!--
Pictures are displayed with an <img> tag called an "image" tag.
You should note 2 special things in the <img> tag below:
1. First of all, like the <br> and the <p> tag, an <img> tag does not have a closing tag - it simply exists all by itself.
2. There is code inside the image tag. There are many HTML tags which have extra code inside of them. Computer-nerds call these things "attributes" but we can just call them "stuff inside the tag" because that sounds less nerdy.
In this example, the stuff inside the image tag is called "src" (which is short for "source") and provides the image tag with a filepath to an image to be displayed. Note that an image MUST be a ".jpg" or ".gif" or ".png" file in order to appear on a webpage. No other formats will work. That's just how browsers are. Well... kind of... There are newer formats like ".svg" and ".webp" too, but all browsers still support the first three I mentioned.
-->
<img src="images/sunset-palm.jpg">
<p>
Note the sourcecode after "src=" gives the filepath to the image based upon the folder structure from the point where the current page resides. In this case, there is an "images" folder which contains an image called "sunset-palm.jpg" and that is the image displayed on the page. Also take note that there is no closing tag for an image.
<p>
<a href="lesson-g-text-formatting.html">This text links to the next page</a> and uses code that is very similar to the image tag. Below, you will find links to all of the previous pages we have viewed. Again, the code is fairly self-explanatory when you view the source:
<p>
Note, you can also force links to open in the same bowser window, or in a new window, using the "target" attribute.
<p>
<!--
As you can see below, links are opened with "<a>" tags and closed with "</a>" tags. In addition to the <a> there is a parameter (or "attribute" or "stuff inside the tag" or... whatever) inside called "href" which provides a filepath to the webpage you are linking to.
-->
<a href="lesson-g-text-formatting.html" target="_top">This text uses <b>target="_top"</b> and links to the next page in the same window.</a>
<p>
<a href="lesson-g-text-formatting.html" target="_blank">This text uses <b>target="_blank"</b> and links to the next page in a new window.</a>
<p>
<a href="lesson-a-comments.html">First page</a>
<br>
<a href="lesson-b-tags.html">Second page</a>
<br>
<a href="lesson-c-titles.html">Third page</a>
<br>
<a href="lesson-d-without-comments.html">Fourth page</a>
<br>
<a href="lesson-e-paragraphs.html">Fifth page</a>
<p>
So, remember, we use "IMG SRC" for image tags and "A HREF" for link tags. IMG tags do not have a close. A HREF tags do have a close. You can also make an image a link, simply by wrapping the link tag around an image tag, like so:
<p>
<a href="lesson-g-text-formatting.html"><img src="images/steamboat.jpg"></a>
</body>
</html>
So far, we just have plain, small text on the screen. The default size and font of text is kind of boring. What happens when you want to do some more fancy formatting to the text? There are a lot of commands you can use in HTML to make your text different. That is in the next lesson.
PART 9 - LESSON G - TEXT FORMATTING
<html>
<head>
<title>HTML for Non-Programmers</title>
</head>
<body>
Since you should now have a good understanding of tags, I won't go into a detailed explaination for each of these new tags. I'll simply show you what they do and you can view the sourcecode to see how they work. This page is going to be pretty long compared to the previous ones. It will show you a lot of ways to format your text from changing the font sizes, to making letters bold and italic, and more.
<p>
<!-- As you can see below, an "italic" tag is very simple, it's just the tag <i> to open and </i> to close. -->
<i>This sentence uses an italic tag.</i>
<p>
<!-- As you can see below, a "bold" tag is very simple, it's just the tag <b> to open and </b> to close. -->
<b>This sentence uses a bold tag.</b>
<p>
<!-- As you can see below, a "strong" tag is very simple, it's just the tag <strong> to open and </strong> to close. -->
<strong>This sentence uses a strong tag. As you can see, "strong" and "bold" do the exact same thing. "Strong" is the newer version of "bold" tags. Computer-nerds will tell you not to use "bold" and only use "strong" instead. Do not listen to them. Use whichever one you want. They both work fine. I prefer "bold" simply because it's a lot less to type.</strong>
<p>
<!-- As you can see below, a "em" tag is very simple, it's just the tag <em> to open and </em> to close. -->
<em>This sentence uses a strong tag. As you can see, "em" and "italics" do the exact same thing. "em" is the newer version of "italics" tags. Computer-nerds will tell you not to use "italics" and only use "em" instead. Do not listen to them. Use whichever one you want. They both work fine. I prefer "i" simply because it's a lot less to type.</em>
<p>
Note that you can also "nest" these tags inside each other, in order to cumulatively add parameters to a font. That's a fancy way to say "make 'em do a bunch of stuff at the same time"...
<p>
<b><i>For example, this sentence is bold AND italic.</i></b>
<p>
Pay close attention when viewing the sourcecode for the previous sentence and see how the tags are nested. The most important thing to remember when nesting tags is to CLOSE THEM IN EXACT REVERSE ORDER. <i><b>You can start with bold or italic - it doesn't matter which order you open them - just be sure to close them in the reverse order you opened them with.</b></i>
<p>
Why is it important to close your tags in exact reverse order? Two reasons:<br>
1. It's a lot easier to read the code and understand what is going on when things are organized in order.<br>
2. Browsers will sometimes get confused and start acting all wonky if you start closing your tags in a haphazard order. This is especially true when you start using more powerful and sophisticated tags which control things like page layout. If you start opening and closing page layout tags in the wrong order, your whole page can break. So, get into the good habit of always closing things in reverse-order.
<p>
By the way, if you aren't viewing the sourcecode on this page yet, now might be a good time to start. Lots of instructions are starting to get buried in the comments here.
<p>
<!--
You could use a <span> tag or a <div> tag to add "inline styles" to your fonts. In fact, many people use <span> and <div> rather interchangably.
The primary difference between the <span> and <div> tags is that <span> doesn't do any formatting of it's own. The <div> tag includes a paragraph break, because it is defining a division in the document. The <span> tag simply tells the browser to apply the style parameters to whatever is within the <span>.
-->
<span style="color: #ff0000;">Fonts can also be colored to any color you want.</span> <span style="color: #003cff;">And again, colors and other parameters can be combined - for example, colored fonts with <b>bold</b> and <i>italics</i> or both <b><i>italic and bold simultaneously</i></b>.</span>
<p>
Font colors use a # symbol, followed by 6-digit code (called a "hexadecimal" or "hex") to determine the color being shown. How do you find the hexadecimal code (or "hex value") to create the color you want? There are many options - various image editors give hex values,
<!--
Notice in the link below, I added a new attribute which I haven't mentioned before called "target". The "target" attribute tells the browser where to open the link. If you don't include a "target" thingy in your tag, the default is to open a link in the same window. But, you can also force the browser to launch a new window for a link too.
The code for a new window is:
target="_blank"
The code for the same window is:
target="_top"
There are a few other ways to open new windows or the same window, but, I'll only mention those 2 because they are the best way to do it for various technical reasons that you don't need to concern yourself with. We don't wanna get overly nerdy here. Just trust me.
Another unique thing about the link below - notice that it goes to a full URL at Google? The links I've shown on other pages are called "RELATIVE" links (or a "relative path") and they link to pages and folders within your own website. Using a full URL is called an "ABSOLUTE" link (or "absolute path") and links to outside sites. Although, you CAN use an absolute path for linking to pages within your own website too, but it's not necessary nor is it common practice for anyone to do that. In over two decades of web development, I only used absolute paths within my own site once, and that was to fix a quirky problem with a Flash file.
-->
<a href="http://www.google.com/search?q=hex+color&rls=com.microsoft:en-us&ie=UTF-8&oe=UTF-8&startIndex=&startPage=1" target="_blank">a Google search for "hex color"</a>, there are even small applications that can help you out. Quick little side note - you can use a hex value to change the background color of an entire page too - <a href="backgroundcolor.html" target="_blank">click here</a> to see an example.
<p>
Similar to "bold" and "paragraphs", there are 2 ways to color your fonts. You can use a "font tag" or you can use an "inline style" to get the same result. I highly recommend learning the "inline style" method.
<p>
Why use "inline styles" instead of "font-tags" for coloring your font?
<p>
Because "inline styles" are a direct relative to "cascading style sheets" (known as "CSS") which are a very robust and powerful way to control numerous aspects of your page such as text parameters. While both an "inline style" and a "font tag" only apply to a single instance of text, CSS can control text all over multiple pages of an entire website. In other words - if you change a specified CSS font color from red to blue, it will change all instances of that font, all over your site, instantly! If you use "font tags" or "inline styles" you'd have to change each font color individually. Hence, during the learning process, I suggest you apply customization to your text with "inline sytles" because by learning those, you will already understand 80% of CSS when it comes time to learn CSS functionality.
<p>
Not only can you make text bold using a <b>bold tag</b> or a <strong>strong tag</strong>, but can also do it <span style="font-weight: bold;">with an inline style</span> as well - in fact, this sentence uses all 3 methods. View the source and check it out.
<p>
<!--
THE BELOW SENTENCE USES AN INLINE STYLE FOR FORMATTING
-->
This sentence is using an "inline style" for making <span style="color: #003cff; font-weight: bold;">this text bold and blue <span style="font-weight: normal; font-style: italic;">and for making this text italic</span></span>.
<p>
<!--
THE BELOW SENTENCE USES FONT TAGS FOR FORMATTING
-->
This sentence is using "font tags" for making <font color="#003cff"><b>this text bold and blue</b> <i>and for making this text italic</i></font>.
<p>
As you can see, the two sentences above look identical in a browser, but the code looks very different when you "view source" for this page. The "inline style" approach is a little more complicated, but, again, I recommend that you learn "inline styles", simply because it will make CSS far easier to understand, and you will really enjoy the power and flexibility you get from CSS.
<p>
<!--
The tag below is called a "horizontal rule" and simply draws a horizontal line across the page. You can add a "width" attribute to change the size. The width can be specified in a percentage of the page width, or in pixels like so:
<hr width="45%">
or...
<hr width="200px">
In this case, I am not using a width attribute, so the default is to render the line as wide as the page.
-->
<hr>
<p>
Another HTML tag for text formatting is called a "headline" tag. One of the unique features of a "headline" tag is providing an automatic paragraph-break, underneath the text, once the tag is closed.
<p>
<h1>This uses a "H1" headline tag. Note the automatic paragraph break beneath this line.</h1>
<h2>This uses a "H2" headline tag. Note the automatic paragraph break beneath this line.</h2>
<h3>This uses a "H3" headline tag. Note the automatic paragraph break beneath this line.</h3>
<h4>This uses a "H4" headline tag. Note the automatic paragraph break beneath this line.</h4>
<h5>This uses a "H5" headline tag. Note the automatic paragraph break beneath this line.</h5>
<p>
<hr>
<p>
Once again, the below text illustrates how an HTML tag for text formatting (namely the "headline" tag) can be "recreated" using an "inline style" instead. However, an "inline style" does not provide the automatic paragraph break - when using inline styles, the line breaks must be inserted manually.
<p>
<span style="font-size: 32px; font-weight: bold;">This uses an "inline style" to attain a similar effect as a H1 "headline tag."</span>
<p>
<span style="font-size: 24px; font-weight: bold;">This uses an "inline style" to attain a similar effect as a H2 "headline tag."</span>
<p>
<span style="font-size: 18px; font-weight: bold;">This uses an "inline style" to attain a similar effect as a H3 "headline tag."</span>
<p>
<span style="font-size: 14px; font-weight: bold;">This uses an "inline style" to attain a similar effect as a H4 "headline tag."</span>
<p>
<span style="font-size: 12px; font-weight: bold;">This uses an "inline style" to attain a similar effect as a H5 "headline tag."</span>
<p>
<!--
The tag below is called a "horizontal rule" and simply draws a horizontal line across the page. You can add a "width" attribute to change the size. The width can be specified in a percentage of the page width, or in pixels like so:
<hr width="45%">
or...
<hr width="200px">
In this case, I am not using a width attribute, so the default is to render the line as wide as the page.
-->
<hr>
<p>
Now, let's cover another common need in text layout - numbering lines and bullet points. This is very simple code too. Be sure to view source and see how it was done. Here are examples of each:
<!--
The tag <ol> stands for "ordered list" and indicates that you want your line-items to be numbered. The tag <li> stands for "line item" and you place that in front of each thing you want to have a number. Note the <li> tags do NOT have a close tag, but the <ol> MUST be closed at the end of your list.
-->
<ol>
<li>First number item.
<li>Second number item.
<li>Third number item.
<li>Fourth number item.
<li>Fifth number item.
</ol>
<p>
<!--
The tag <ul> stands for "unordered list" and indicates that you want your line-items to be bulleted. The tag <li> stands for "line item" and you place that in front of each thing you want to have a bullet point. Note the <li> tags do NOT have a close tag, but the <ul> MUST be closed at the end of your list.
-->
<ul>
<li>First bullet item.
<li>Second bullet item.
<li>Third bullet item.
<li>Fourth bullet item.
<li>Fifth bullet item.
</ul>
<hr>
<p>
Finally, let's show you how to change the font itself. We have just been using the default "Times New Roman" font. But, by using a font tag, we can change the font to be anything a user has on their system. For example...
<p>
<font face="arial">This sentence uses the "Arial" font tag.</font><br>
<font face="courier">This sentence uses the "Courier" font tag.</font><br>
<font face="verdana">This sentence uses the "Verdana" font tag.</font><br>
<font face="tahoma">This sentence uses the "Tahoma" font tag.</font><br>
<p>
However...
<p>
With the dawn of HTML5 (the latest and greatest iteration of HTML) the "font face" tag is no longer officially supported. Therefore, you should use an inline style instead. That looks like this...
<p>
<span style="font-family:arial;">This sentence uses the "Arial" font style.</span><br>
<span style="font-family:courier;">This sentence uses the "Courier" font style.</span><br>
<span style="font-family:verdana;">This sentence uses the "Verdana" font style.</span><br>
<span style="font-family:tahoma;">This sentence uses the "Tahoma" font style.</span><br>
<hr>
<p>
So far, we have covered a lot of basics in a very short time. We covered many variations of formatting text, changing the color of a whole webpage, adding images to the page, linking text, and linking images. Of course, all our content simply runs down the lefhand side of the page and that's not a very compelling way to build a website. The next step is to start some real formatting and page layout.
<p>
<a href="lesson-h-page-layout.html">This text links to the next page</a>. Below, you will find links to all of the previous pages we have viewed.
<p>
<!--
As you can see below, links are opened with "<a>" tags and closed with "</a>" tags. In addition to the <a> there is a parameter inside called "href" which provides a filepath to the webpage you are linking to.
-->
<a href="lesson-a-comments.html">First page</a>
<br>
<a href="lesson-b-tags.html">Second page</a>
<br>
<a href="lesson-c-titles.html">Third page</a>
<br>
<a href="lesson-d-without-comments.html">Fourth page</a>
<br>
<a href="lesson-e-paragraphs.html">Fifth page</a>
<br>
<a href="lesson-g-text-formatting.html">Sixth page</a>
</body>
</html>
The final lesson on basic HTML is to show you some page layout and formatting.
PART 9 - LESSON H - PAGE LAYOUT
<html>
<head>
<title>HTML for Non-Programmers</title>
</head>
<body>
We're going to start page layout using "tables" built in HTML.
<p>
Before we begin - a fair warning - this is where HTML starts to get a little more challenging and confusing. Learning basic tags and structures which are solid and unchanging is easy. I mean, you can only make <I>italic text</I> in 2 possible ways. That's pretty straightforward. There are no variations. No options. No variables.
<p>
Tables are a different story.
<p>
<img src="images/lego-bricks.jpg" align="right">Think of tables in HTML like Lego bricks - their structure is solid and unchanging, but the options in which they can be creatively combined are endless and can become very intricate. Therefore, if you have been sailing through this learning process with ease, don't become discouraged if tables suddenly "slow you down" and get really confusing. Tables certainly have the potential to be quite befuddling. So, just take it easy and know that you may need to re-read this page and study this code a little bit more than the previous material.
<p>
Also, like Legos, you can build HTML tables in a very "clean" and streamlined way, or you can build a near-identical-looking structure in a rather "sloppy" way. Just like learning to build with Legos, your first HTML tables will likely be poorly constructed. That's okay. Give youself permission to screw up and do it badly. In time and with experience, you'll learn to make things more elegantly and efficient.
<p>
In the simplest terms, "tables" are made up of <b>rows</b> and <b>columns</b> to create a grid on the page which holds your content. The squares of the grid are called <b>cells</b>. The content in your table cells can be anything from text to images to video to whatever. Tables can have visible or invisible borders. For this course, we will obviously leave the borders visible most of the time, so you can see where the tables are on the page. This is another page where viewing the comments in the sourcecode will teach you far more than what you see in the browser.
<p>
<!--
What you see below is the most "basic" layout for a table.
Note the order in which tags are opened and closed. This is what I was talking about earlier, when I said you need to get into a good habit of opening and closing things in the proper order, because things can break and get really loopy if you don't.
The <tr> tag means "table row" - so <tr> starts a new row and </tr> ends that row.
The <td> tag means "table data" and indicates a "cell" within the table. The <td> cells are always nested within <tr> tags. All the text/images/whatever in "table cells" are between <td> and </td> and contain the content of the table.
All tables require those 3 elements, in this order, at a bare minimum:
<table>
<tr>
<td>
And, of course, their corresponding closing tags, DONE IN REVERSE-ORDER:
</td>
</tr>
</table>
Tables can be very intimidating and confusing, so don't worry if you don't understand them immediately. I have included the most simplistic of tables as examples below, so you can study them and see how they are constructed. Don't worry if it takes awhile to understand them.
The "border" is what turns the border on and off. The number indicates how many pixels-wide the borders are. If you set the "border" to be "0" it becomes invisible.
-->
<table border="1">
<tr>
<td>This text is inside a single table cell with a 1-pixel border.</td>
</tr>
</table>
<!--
Above this comment ends the first table on the page.
-->
<p>
<table border="5">
<tr>
<td>This text is inside a single table cell with a 5-pixel border.</td>
</tr>
</table>
<!--
Above this comment ends the second table on the page.
-->
<p>
<!--
As you can see in the example below, it's best to place the HTML for your table rows and table cells on their own indented lines, simply so your sourcecode is easier to read. Since tables can become very complicated, making the code as legible as possible is very important.
-->
<table border="1"><tr><td>This table has all of the sourcecode in a single line. It displays in a browser the same as the first tables above, but it gets harder to read when you view source.</td></tr></table>
<p>
<table border="1">
<tr>
<td>This text is inside a table with 2 columns.</td>
<td>This text is inside the second column.</td>
</tr>
</table>
<p>
<table border="1">
<tr>
<td>This text is inside a table with 2 rows.</td>
</tr>
<tr>
<td>This text is inside the second row.</td>
</tr>
</table>
<p>
<table border="1">
<tr>
<td>This text is inside a table cell.</td>
<td>This is another cell, with a table nested below this sentence.<p>
<!--
Note the table below is actually constructed WITHIN the "table cell" of another table. Capabilities of this nature is where layouts can become very powerful, but can become very confusing.
-->
<table border="1">
<tr>
<td>This is a table...</td>
</tr>
<tr>
<td>... nested within the cell of another table.</td>
</tr>
</table>
</td>
</tr>
</table>
<p>
The "cells" within table can also "span" rows and columns. This is where table layout can get really intricate. Let's start simply:
<p>
<table border="1">
<tr>
<td colspan="3">This text spans 3 columns.</td>
</tr>
<tr>
<td>A</td>
<td>B</td>
<td>C</td>
</tr>
</table>
<p>
<table border="1">
<tr>
<td rowspan="3">This text spans 3 rows.</td>
<td>1</td>
</tr>
<tr>
<td>2</td>
</tr>
<tr>
<td>3</td>
</tr>
</table>
<p>
As you can imagine, between nesting tables and "colspan" and "rowspan" attributes, you have an enormous amount of diversity and control over your table layouts. Tables can also have many, many cells and rows and columns, like you can see below:
<p>
<table border="1">
<tr>
<td>1</td>
<td>2</td>
<td>3</td>
<td>4</td>
<td>5</td>
</tr>
<tr>
<td>6</td>
<td>7</td>
<td>8</td>
<td>9</td>
<td>10</td>
</tr>
<tr>
<td>11</td>
<td>12</td>
<td>13</td>
<td>14</td>
<td>15</td>
</tr>
</table>
<p>
Below is the same table as the previous one, but with the borders turned off. To achieve this, note I simply changed the border from <b>border="1"</b> to read <b>border="0"</b> instead...
<p>
<table border="0">
<tr>
<td>1</td>
<td>2</td>
<td>3</td>
<td>4</td>
<td>5</td>
</tr>
<tr>
<td>6</td>
<td>7</td>
<td>8</td>
<td>9</td>
<td>10</td>
</tr>
<tr>
<td>11</td>
<td>12</td>
<td>13</td>
<td>14</td>
<td>15</td>
</tr>
</table>
<p>
<table border="1" cellspacing="0" cellpadding="0">
<tr>
<td>This table has added attributes of "cellspacing" and "cellpadding" which are set to "0". If you do not declare a "cellspacing" and "cellpadding" amount, the default for cellspacing and cellpadding is "2" pixels.</td>
</tr>
</table>
<p>
<table border="1" cellspacing="10" cellpadding="0">
<tr>
<td>This table has an added attribute of "cellspacing" which is set to "10" and "cellpadding" which is set to "0".</td>
</tr>
</table>
<p>
<table border="1" cellspacing="0" cellpadding="10">
<tr>
<td>This table has an added attribute of "cellspacing" which is set to "0" and "cellpadding" which is set to "10".</td>
</tr>
</table>
<p>
<table border="1" width="100%">
<tr>
<td>This table has a width of "100%".<br>Resize your browser window and this table will always stretch across the whole screen.</td>
</tr>
</table>
<p>
<table border="1" width="50%">
<tr>
<td>This table has a width of "50%".<br>Resize your browser window and this table will always stretch across half the screen.</td>
</tr>
</table>
<p>
<!--
The table below uses a "width" parameter to control the size of the table. This can be expressed as a percentage or as a size in pixels. In this case, I'm using a size of 500 pixels in width. Note I also removed the "border" parameter and removing that parameter automatically makes the border invisible. You can also use border="0" to get the same effect.
-->
<table width="500">
<tr>
<td>
Okay, I know that was a LOT to absorb all at once. Don't fret. As I said earlier - tables are one of the areas where beginners often get really perplexed and intimidated by HTML. Since tables are pure "customization", they can become very confusing. However, learning HTML tables is the big "cornerstone" of HTML layout. Tables are very powerful tools which provide a large amount of controls. There isn't much "creativity" involved in a <b>bold</b> tag. But tables? Tables are pure creativity. I can show you how they work, but you need to figure out what to do with them to suit your own needs.
<p>
"Tables" are another feature of HTML which computer-nerds consider to be "outdated" and will tell you not to use them.
<p>
Terrible advice.
<p>
Why? Because it all depends on your reason for using them! There are a number of very popular websites still using tables for certain types of information, because sometimes a big old chart or graph is the best thing to use.
<p>
Well, that about covers all the basics of HTML!
</td>
</tr>
</table>
<p>
Below, you will find links to all of the previous pages we have viewed.
<p>
<!--
As you can see below, links are opened with "<a>" tags and closed with "</a>" tags. In addition to the <a> there is a parameter inside called "href" which provides a filepath to the webpage you are linking to.
-->
<a href="lesson-a-comments.html">First page</a>
<br>
<a href="lesson-b-tags.html">Second page</a>
<br>
<a href="lesson-c-titles.html">Third page</a>
<br>
<a href="lesson-d-without-comments.html">Fourth page</a>
<br>
<a href="lesson-e-paragraphs.html">Fifth page</a>
<br>
<a href="lesson-g-text-formatting.html">Sixth page</a>
<br>
<a href="lesson-h-page-layout.html">Seventh page</a>
</body>
</html>
Congratulations! You made it through the first step of the process. Those are the basics of HTML and simple web pages. There are a lot more HTML tags which I didn't cover, but again, the purpose of this course is to teach the basics. This is not intended to make you an expert. I just want to share the fundamentals and let you start to learn and expand your knowledge from there.
My philosophy of code has always been that old adage of K.I.S.S. - "Keep it simple, stupid."
Build all your websites using HTML. Period.
If HTML is incapable of accomplishing what you need, add the next-most-complicated technology.
Will it be easier to build using CSS? Then add some CSS.
Do you need things that can only be done with JavaScript?
Then add some JavaScript.
Does your website have to use PHP and a database?
Fine. Then add that.
But don't ever use technology that is overly-complicated or unnecessary.
Always. Use. What. Is. The. Most. Simplistic. Technology. For. The. Task. At. Hand.
And one more thing...
 TRON FIGHTS FOR THE USERS!
Remember, the guest, the users are the MOST IMPORTANT THING. We build websites for the users.
Computer nerds don't.
Computer nerds like to show off their knowledge of the latest and greatest technology. They think it's "cool" to waste away their weekend, learning the hip and trendy new framework, or library, or building out a new server technology.
No.
That's not cool.
That's a pathetic waste of time. Get a life, you nerds!
Don't misunderstand. I'm not saying a person shouldn't learn new technology. Obviously, I wouldn't be building an educational website teaching technology, if I didn't think people should learn it! I'm simply saying, don't learn technology because you think it's "neat" or "cool"; learn technology that will benefit the users. Because users don't care about the technology you have learned. Users don't care if a website is built with HTML or XHTML. Users don't care if a site uses CSS or PHP or jQuery libraries or the latest framework. Users just want a website that works and provides the information they need in a timely manner.
Does the website crash?
Does it take forever to load?
Is it easy to navigate?
Can they find what they are looking for?
Can they save the page?
Can they print it out?
Can they bookmark it to reference later?
Those are the issues and features users care about. Make sure you are building websites which allow users to do those things. Respect the needs of the users, first and foremost. This isn't about you. This isn't about your ego. This isn't about your skills or your knowledge. This isn't about impressing your coworkers and peers. Only computer nerds care about that irrelevant popularity contest.
Computer nerds are jerks.
Because computer nerds only care about what they think is cool.
Computer nerds don't care about users or the needs of the users.
Don't be a computer nerd.
Care about the users above all else. Respect the users. The users are what matter. Your own ego is not relevant. Unless you're a socially-inept computer nerd, who puts your own arrogance above the needs of those you are supposedly trying to help.
And remember, kids, the world owes you nothing... until you create things of value.
Glossary
refresh/reload
Forcing the web browser to display a new or updated version of the webpage code it is currently showing.
syntax-highlighting
Text editing programs which use color-coding to distinguish different sections of computer code.
view source
Having a browser display the HTML code it is rendering, in order to create the webpage you are currently viewing.
WYSIWYG
An acronym for "What You See Is What You Get" and is pronounced "whizzy-wig".
.zip file
A compact file containing a batch of other files. .ZIP files are used to share and transfer a group of files together, so users do not have to download one file at a time.
Downloads
Microsoft Windows Software
Apple macOS Software
Other Articles